Building frames is called ‘joining’ in the picture framing industry. There are several methods for joining frames, depending on the frame material and the equipment available. Most frames require four straight pieces of moulding cut with a 45-degree miter at each end. Each piece of cut moulding is called a rail.

Assembling Sectional Frames
Sectional frames are precut rails of moulding with mitered ends. They are sold in pairs, and each frame requires two pairs, one for the length of the frame and one for the width. The corners are joined by the DIY framer using the hardware designed for the frame. The most common type of sectional frame is metal (normally aluminum), but wood sectional frames are also available. There are many sizes and profiles, but the assembly methods are similar. If you are ordering a sectional frame, make sure the joining hardware is included; sometimes it must be ordered separately.
Assembling a Wood Sectional Frame
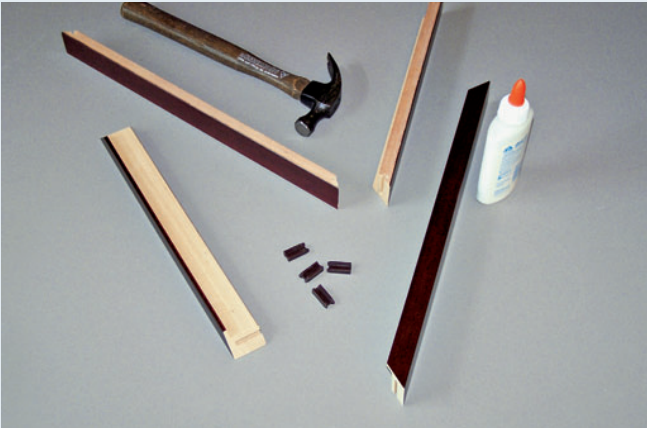
The corner of each rail has a slot routed out to hold a plastic wedge that will join the frame.
1. Lay the four rails of the frame face down with corners matched.
2. Squirt a little bit of wood glue onto one end of raw moulding on one rail of the frame. Place the adjacent rail of the frame against the glued end.
3. Holding the corner together, insert the joining wedges (these may be called thumbnails, dovetails, or angle pins) into the slot in the corner. Tap with a hammer if necessary.
4. Repeat on the remaining three corners.
Assembling a Metal Sectional Frame
Fitting is the term framers use to describe the process of finishing the framing: securing the framing materials in the frame, sealing it up, and adding finishing touches like hangers and bumper pads. With a metal frame, building the frame and fitting are blended, so most of the process is covered in Fitting.
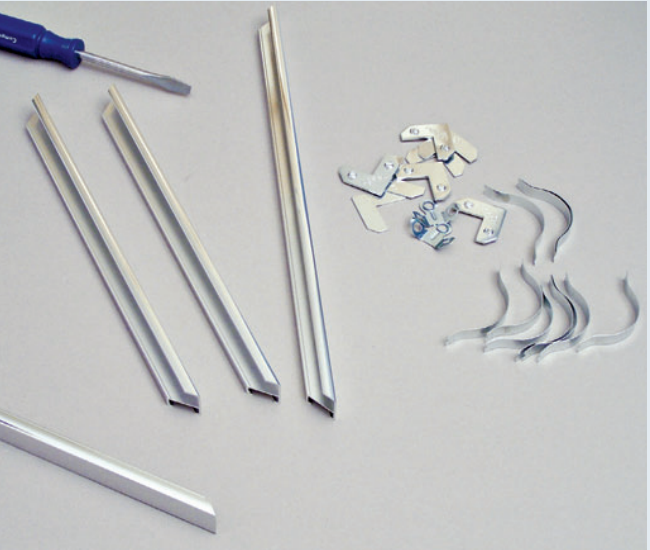
1. Four rails of metal moulding and a set of corner hardware are needed to join a metal frame. The hardware varies slightly depending on the manufacturer of the frame. Place the four rails and the hardware on the worktable.
2. Insert the corner hardware into the channel of one frame rail. Slide the adjoining rail onto the hardware, and tighten the screws with a screwdriver. Repeat to attach the third rail.
Assembling a Clip Frame
Clip frames use simple clip hardware to hold the framing materials together. They are not really frames, because they do not fully surround the framing materials, so the edges of the glazing and other framing materials are exposed. There are two main types; those that allow a variable size, and those that include a backing board that determines the size. Clip frames either snap over the framing materials, or use a cord to join the clip hardware behind the backing board.

Custom-Cut Frames
A wide variety of custom-cut wood and metal mouldings is available at Custom Framing Wholesale. In professional framing, a frame that is ordered precut is called “chopped.” A chopped frame is four pieces (rails) of moulding cut to a specific size by a supplier. DIY suppliers may call them “precut” or “custom cut” frames. Custom metal frames are assembled using the same sort of hardware used for precut metal sectional frames; check to see if hardware is included in the frame order, because sometimes it must be ordered separately. Unassembled custom wood frames usually have routed corners and corner wedges for assembly, but they may simply be mitercut rails of moulding that need to be nailed together. Check to see what is available from each supplier. Ask about the ‘allowance policy’ when ordering any custom-cut frame. 1/8″ (3 mm) is customary, but some may use 1/16″ (2 mm) or cut the frame exactly as ordered.
DIY Frame-Making
For some people, cutting and building their own frames is an essential part of do-it-yourself framing. This is a carpentry project, using saws, vises, and other woodworking equipment. As always in framing, accurate measuring and cutting are essential for success. Problem-solving abilities come in handy; warped moulding and fragile moulding finishes are a couple of the typical challenges encountered when making frames.
Sources for Picture Frame Moulding
Moulding for picture frames is sold in sticks of varying lengths. The most common are 8′ (2.4 m) and 10′ (3 m), but there are others, such as 6′ (1.8 m) and 12′ (3.7 m). Local lumberyards or home improvement stores may carry some picture frame moulding, although most of the moulding available from these sources is decorative moulding, with no rabbet to hold framing materials. We offer a bigger selection to meet the requirements of our customers. The sticks should be as straight as possible—warped moulding creates serious problems when cutting and joining frame corners. The vast majority of the thousands of available picture frame mouldings are sold to wholesale buyers only. There are many wholesale framing supply distributors; if there is one in your area, find out about their terms.
Selecting Wooden Moulding
When buying moulding to cut with a saw, consider the type of wood. Many picture frame mouldings are made from woods that are easily cut, without chipping the finish. But some are hard, dense woods, such as oak or maple, and some ornate frames have a fragile finish. Find out all you can about a moulding before buying it to make sure it is something your equipment can handle.
Measuring Moulding
Once the framing is designed, it is time to determine how much moulding will be needed for the frame. At this point, the length and width of the frame opening is known, and two pieces of moulding will be needed for each dimension; but that only accounts for the ‘running inches’—the number of inches (centimeters) it takes to go around the opening of the frame. Additional moulding is needed to extend to the outer edges of the mitered corners. Each of the four sides of the frame will have a 45-degree miter cut at each end, and every one of those eight cuts requires an extra moulding width of moulding to accommodate the corners. To determine the moulding width, measure across the top of the moulding, including the rabbet. Then multiply that number by 8 to determine the amount of additional moulding needed. For example, if the moulding is 2″ (5.1 cm) wide, the frame will need 2″ (5.1 cm) × 8 cuts, or 16″ (40.6 cm) of additional moulding.
Note: Actually, because the frame should be cut with an allowance of ⅛” (3 mm) in each direction, an additional ¼” (6 mm) of moulding is needed, but this small fraction is not used in the moulding calculation for individual frames. When buying a moulding to make a dozen or more frames, it may be important to consider those few extra inches or centimeters.