The surface of a mat can be decorated to enhance the visual presentation of the art. The main objective is to add something that improves the presentation, however it should be kept in mind that the decoration should not overcome the art. As a general rule of proportion, the decoration should be within the first one-third of matting from the opening. For decorative lines surrounding the mat opening, it is best to alter the width of the decorative elements.
Making a Fabric-Covered Mat
A typical matboard has a paper surface. Covering a mat with fabric adds richness and texture that can be elegant, sophisticated, formal, or even plain, depending on the fabric. Most any medium-weight, even-weave fabric can be used to cover a mat, from velvet to linen. Other textiles, such as leather or vinyl, may work as well. When covering a matboard with fabric, it is generally best to use a light cream color, gray, or beige board, as bright white or dark matboards can show through and affect the appearance of the fabric. Notice that the mat is cut before being covered with fabric; this is because most fabrics fray or wrinkle along the mat opening if cut after mounting. A reverse-bevel mat makes it easier to shape the fabric at the corners.
Method 1: Using an Adhesive-covered Board
To attach the fabric to the board, use a sheet of double-sided adhesive, or purchase an adhesive-coated board and follow these basic steps;
1. Cut the board to the size of the mat. Cut a piece of fabric the same size or, to create some “wiggle-room,” cut the fabric a little larger than the mat, and trim it to size after step 4. Place the board in the mat cutter face up to make a reverse bevel. Cut the mat. Remove the fallout.

2. Remove the paper cover from the adhesive. Carefully position the fabric on the right side of the board, aligning the weave of the fabric with the edge of the board.
3. Use a burnisher or squeegee to adhere the fabric to the surface of the board.
4. Place the fabric-covered board face down on the worktable, and cut the fabric in the window with a sharp craft blade. Make a diagonal slice toward each corner, being careful to stop just a bit short of the corner.
5. Where the diagonal cuts end, cut out and remove the rectangle of fabric from the center of the window.
6. Place strips of double-sided tape surrounding the mat opening, about ½” (1.3 cm) from the opening.
7. Guide the flaps of fabric around the edges of the mat opening, and adhere them to the back of the mat.
8. Smooth the fabric at the corners, easing it around the edges. The mat is completed.
Method 2: Wet Mounting
Use a liquid adhesive such as white fabric or craft glue. Spray adhesive is not recommended, as it does not hold securely over time, and it can stain the fabric. To prepare for mounting: Cut a piece of fabric to size; it is usually best to cut the fabric bigger than needed, trimming it to size after mounting. Cut a piece of matboard to size. Cut the mat face up to make a reverse bevel.
1. Using a flat brush, apply glue evenly to the surface of the mat. Thin the glue with a little water if necessary – not too much water or the adhesive will soak into the board.
2. Working quickly, while the adhesive is wet, position the fabric carefully on the mat, aligning the weave of the fabric with the straight edges of the board.
3. Use a burnisher or squeegee to adhere the fabric to the surface of the board. Don’t use too much pressure, or the glue will be pushed away from some areas. Allow the adhesive to dry.
4. Place the mat face down on the worktable. Using a sharp craft blade, make a diagonal slice about 1″ (2.5 cm) long at each corner, being careful to stop just a bit short of the corner. Where the diagonal cuts end, slice and remove the rectangle of fabric from the center of the window.
5. Trim the excess fabric from the edges of the board.
6. Place strips of double-sided tape surrounding the mat opening, about ¼” (6 mm) from the opening.
7. Guide the flaps of fabric around the edges of the mat opening, and adhere them to the back of the mat.
8. The mat is completed. If you need professional assistance, contact Custom Framing Wholesale.
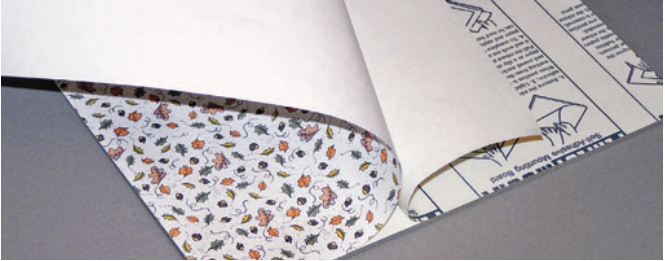
Making a Paper-Covered Mat
Paper can be mounted to a mat using the same process described for making a fabric-wrapped mat. There are tons of beautiful papers available for crafting–especially scrapbooking papers. Any 8″ × 10″ (20.3 × 25.4 cm) mat can be covered with a single sheet of this paper; larger mats such as 11″ × 14″ (27.9 × 35.6 cm) will have to be pieced or can be covered with wrapping paper or other large paper. To burnish the paper to the matboard, roll a brayer, swipe a squeegee, or stroke lightly with a scrap of matboard. Be sure the paper is not too thin or it will wrinkle and tear; this is more of a problem if using wet paste rather than sheets of double-sided adhesive. If the texture of wrinkled paper sounds interesting, try using torn pieces of tissue paper, encouraging small wrinkles rather than smoothing the paper onto the mat.