The following instructions will be applicable to most sectional metal frames. Although there are some variations, most of them will have the same process. Some metal frames have two channels for two sets of hardware, one at the front of the frame and the other at the back, for added strength. In a few cases, the metal frames come with a channel that holds “press-in” plastic hardware to join the corners.
1. Lay the four rails of metal face down on a clean worktable (the surface of a metal frame is easily scratched). Insert corner hardware into one end of one rail. Slide the adjoining rail onto the corner hardware. Adjust for good alignment, then tighten the screws on the corner hardware. Repeat on the opposite end of the first rail. The frame is now a three-sided unit.
2. Stack the glazing (cleaned on the side facing the artwork), mats, artwork, and backing board. Tape them together using the sandwich fit if desired. Place the stack face down. If the backing board is only a matboard, add another matboard or foam center board to the stack as filler board.
3. Slide the stack of materials into the framing channel of the frame.
4. The excess space in the framing channel must be filled to hold the glazing to the front of the frame. This may be done in two ways:
a. The channel may be filled completely with matboard or other board. Simply cut boards to the size of the other framing materials, and slip them into the channel until the channel is full but not tight. Paper dust covers are not used with metal frames, so this board serves as the backing.
b. Curved metal “spring clips,” which are typically included with the metal frame hardware, may be inserted into the excess space along the edges of the frame. This is done after the fourth rail of moulding has been attached.
5. Insert corner hardware into the fourth rail of moulding, and slide the hardware into the hardware channel. Tighten the screws.
6. If using spring clips, lay them on the back of the framing materials, spaced evenly against the edges of the frame, positioned like little hills. Compress each clip and slide it under the lip of the frame channel, pushing it as far as it will go. A screwdriver is helpful for this. Beware of flying spring clips, which can get away from a framer and fling themselves hard and fast in any direction!
7. Install the hanging hardware. This may be a sawtooth hanger, which snaps into the hardware channel at the top of the frame, or two pieces of hardware with holes for stringing wire, which snap into the side channels. (Note: One type of hardware slips into the side channels of the frame before the fourth rail is attached; this hardware should be inserted before step 5.)
8. Clean the face of the glass.
Using Spacers in a Frame
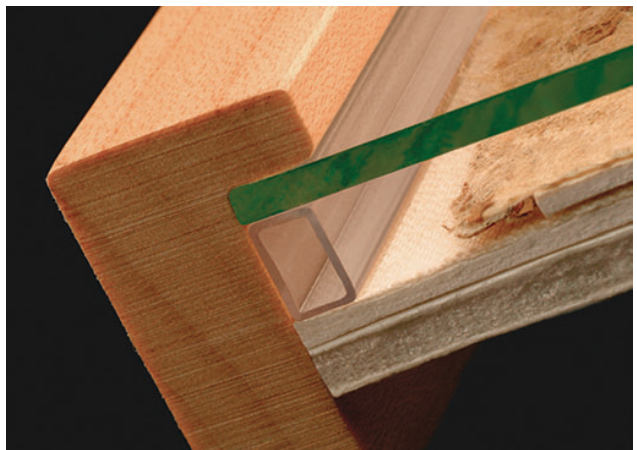
For framing that will last a long time in good condition, glazing should not be placed directly against art; mats are the most common solution. When there is no matting, spacers may be used to separate the glazing from the art. Econospace and Innerspace are two brand names of small rectangular tubes with an adhesive backing that fi t in the rabbet of the frame between the glazing and the art. Spacers can also be made using narrow strips of matboard that run around the entire perimeter of the frame interior; use one or two layers and attach them to the edges of the glazing, hidden in the rabbet, with double-sided tape. Note: Although spacers solve one problem, they can create another: large or thin art on paper may slump or bow into the airspace between the glazing and the art. Custom Framing Wholesale recommend full mounting as the only sure way to prevent this.
Installing an Easel Back
An easel back allows the frame to stand rather than hang on a wall. This is normally used on photos and other small artwork, usually no bigger than 11″ x 14″ (27.9 x 35.6 cm) frames. Larger frames with easel backs are too heavy, and the easel back weakens and splays out, tilting the frame backward. Photo frames come supplied with easel backs, but they can be purchased in small standard sizes from framing suppliers for use with custom frames.
For a wood frame that you want to reopen from time to time, purchase the size that fits the opening of the frame and attach it to the frame with turn buttons at intervals of about 3″ or 4″ (7–10 cm); for a permanent fit, use small nails. For a metal frame, simply use the easel back as the final backing board, inserting it into the metal frame before attaching the fourth rail of the frame.
Framing Art Between Two Pieces of Glazing
This is a decorator-inspired style: The art is pressed between two pieces of glazing, so the art appears to be floating in the middle of the frame, and the wall color or wallpaper pattern shows through the glazing as a border for the art. The pressure of the two sheets of glazing alone will not hold the art in place over time— plus it is unhealthy for the art, as wrinkles often develop.
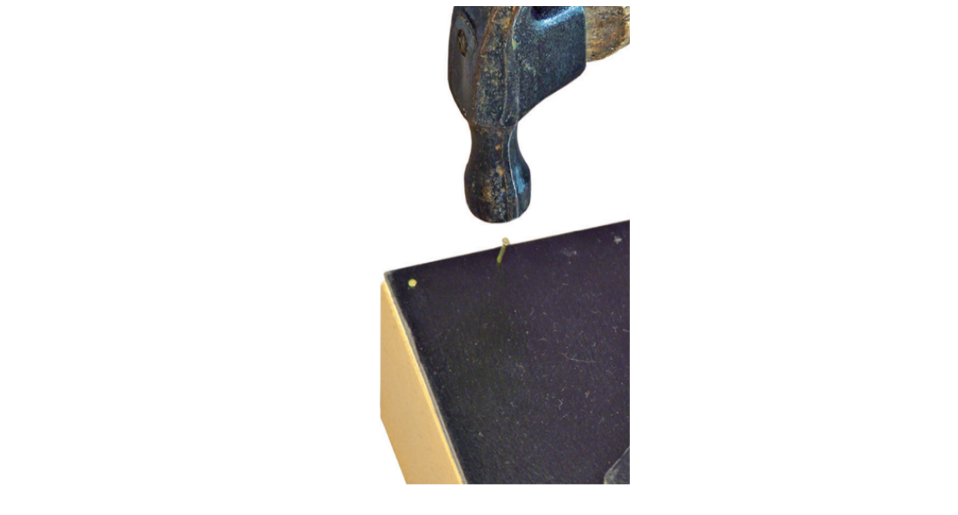
It is best to use spacers between the two sheets of glazing, hidden in the rabbet of the frame; use EconoSpace or narrow strips of matboard. Thoroughly clean the face of the back glazing to remove any adhesive-resistant residue. Attach decorative art to the back sheet of glazing with permanent double-sided tape. For valuable art, cut a piece of conservation matboard about ½” (1.3 cm) smaller than the art, float the art on the matboard using float hinges, then attach the matboard to the back sheet of the glazing with double-sided tape or self-adhesive corner pockets. Clean the top sheet of glazing and place it in the frame. Install the spacers. Add the art, attached to the back glazing. Use short brads or glazier’s points to fit the materials in a wood frame, or the ends of the points will be visible in the framing.
Fitting a Mirror
Follow the steps for fitting a wood or metal frame, but be very careful not to scratch the fragile coating on the back of the mirror. Also be sure to use a backing board to protect the mirror in the frame. Mirrors tend to be heavy, so it is important to use a strong frame and strong hanging hardware. Color the rabbet of the frame black, to control the reflection of the rabbet in the mirror.