What You’ll Learn in This Guide
By the end of this tutorial, you’ll understand:
- How to measure artwork and calculate frame sizes accurately
- Mat cutting techniques that create professional beveled edges
- The difference between glass types and when to use each
- Proper mounting methods that protect (or don’t damage) your artwork
- Frame assembly techniques using glazier points and point drivers
- How to create a sealed dust cover for long-term protection
- Which hanging hardware to use based on frame weight
- The 57-inch rule for professional-looking picture placement
Who This Guide Is For
This picture framing tutorial is designed for beginners with no prior framing experience. If you can use a ruler and follow instructions, you can frame a picture. That said, some projects—like conservation framing for valuable artwork or complex shadow boxes—are better left to professionals. I’ll help you understand when DIY makes sense and when professional framing is worth the investment.
Before You Start: Planning Your Project
Good framing starts with good planning. Before you buy materials or pick up tools, answer these questions:
What Are You Framing?
Different items need different approaches:
- Photographs and prints: Standard framing with mat board works well
- Original artwork: Use archival, acid-free materials throughout
- Posters: Can use basic materials; dry mounting is acceptable
- Documents and certificates: Acid-free materials recommended for longevity
- Canvas paintings: Usually framed without glass using floater frames
- 3D items: Need shadow box frames with depth—consider professional shadow box framing
Where Will It Hang?
Location affects your material choices:
- Direct sunlight: Use UV-protective glass to prevent fading
- Humid areas (bathrooms, kitchens): Seal backing well; consider acrylic over glass
- High-traffic areas: Acrylic is safer than glass
- Above furniture: Keep 6-8 inches clearance below the frame
What’s Your Budget?
DIY framing costs range from $25-75 per frame depending on materials:
- Budget ($25-35): Basic wood or metal frame, paper mat, regular glass
- Mid-range ($40-55): Quality wood frame, acid-free mat, regular glass
- Premium ($60-75+): Solid wood frame, museum mat board, UV-protective glass
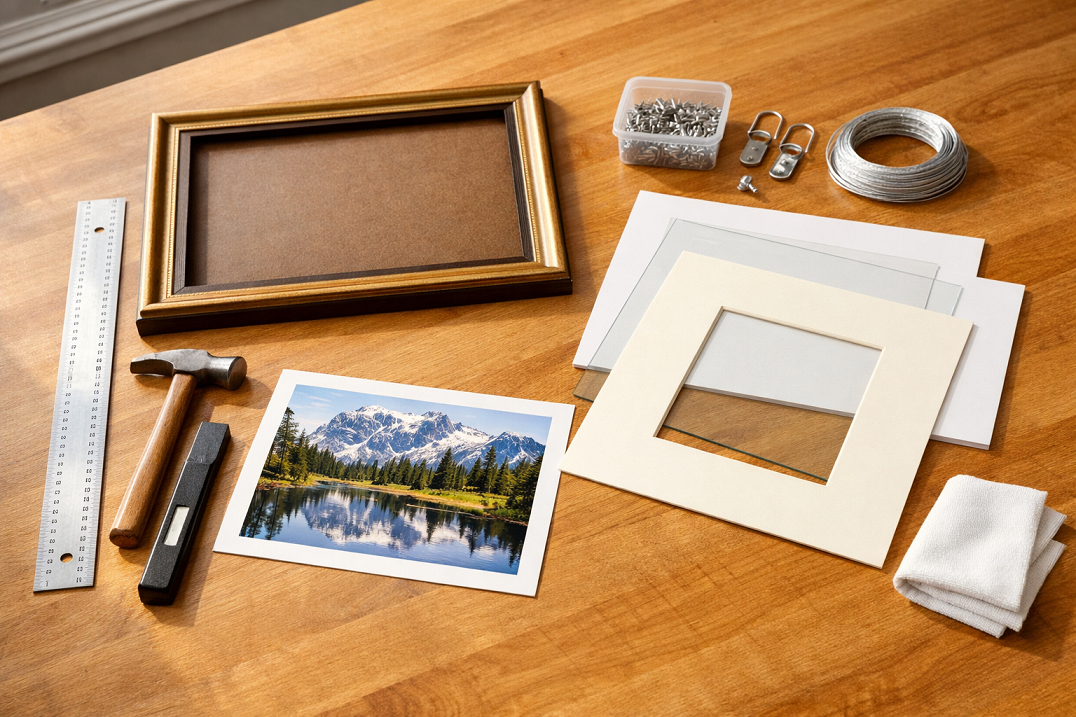
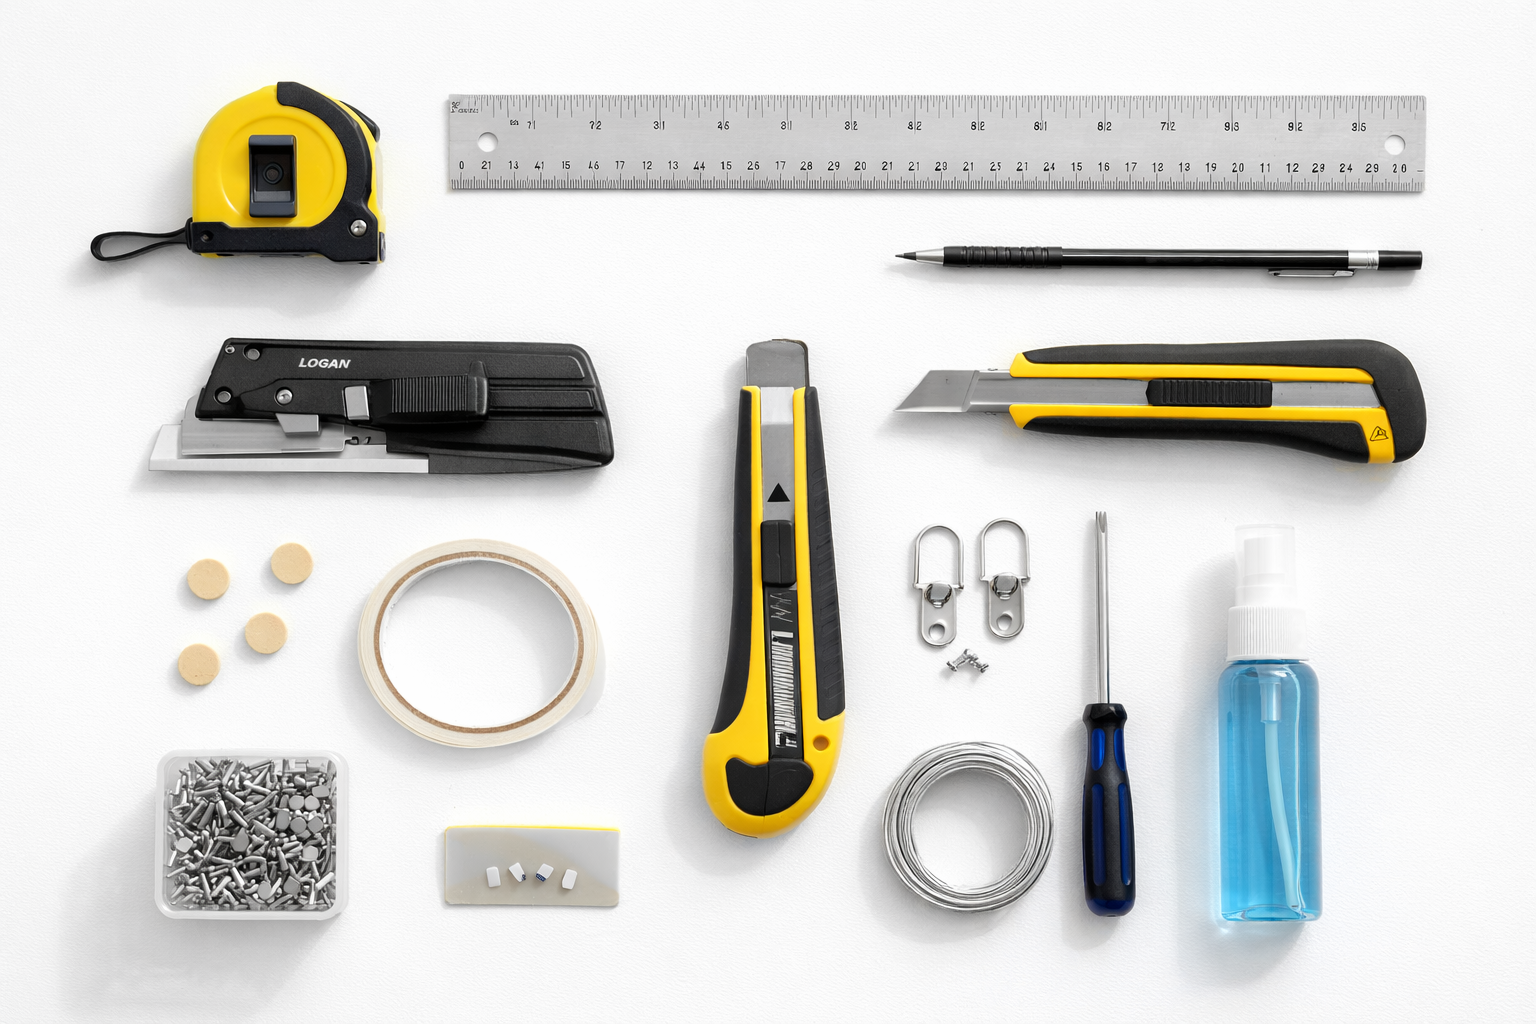
Tools and Materials You’ll Need
🔧 Tools
- Measuring tape or ruler (essential)
- Pencil (essential)
- Mat cutter or utility knife (essential)
- Metal straightedge (essential)
- Glass cleaner (essential)
- Lint-free cloths (essential)
- Screwdriver (essential)
- Point driver gun (optional but recommended)
- Mat cutting system (optional)
- Frame corner clamps (optional)
- Spirit level (optional)
📦 Materials
- Picture frame (sized for your project)
- Mat board (acid-free recommended)
- Backing board (foam core or acid-free board)
- Picture frame glass or acrylic
- Glazier points or turn buttons
- Hanging hardware (D-rings, wire, or sawtooth)
- Kraft paper (for dust cover)
- Double-sided tape or ATG tape
- Framer’s hinging tape (for valuable art)
- Bumper pads
Need supplies? We offer professional-grade wholesale framing supplies without retail markup—including mat boards, glass and acrylic, and mounting boards.
Step-by-Step Picture Framing Tutorial
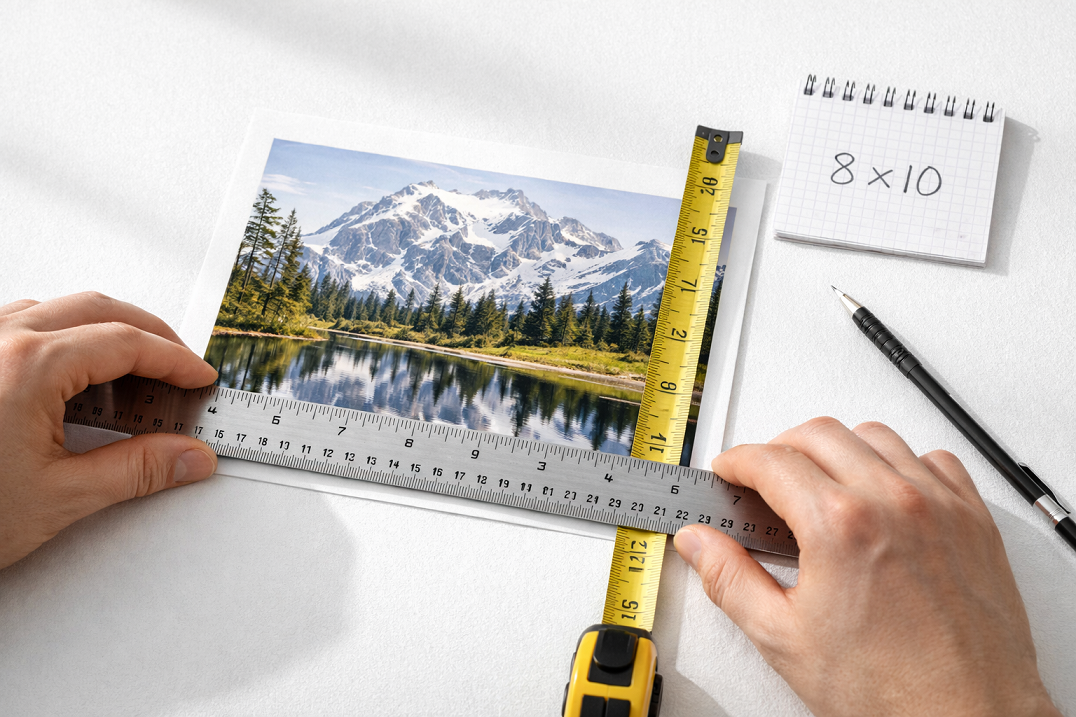
Measure Your Artwork
⏱️ 5-10 minutes
Accurate measurement is the foundation of good framing. Get this wrong, and everything else falls apart.
How to Measure
- Lay your artwork face-up on a clean, flat surface
- Measure the width (horizontal) in inches—measure at the widest point
- Measure the height (vertical) in inches—measure at the tallest point
- Write down dimensions as width × height (e.g., 8×10 means 8 inches wide by 10 inches tall)
Calculate Frame Size
If using a mat, add the mat border width to all sides:
- Artwork size: 8×10 inches
- Mat border: 2.5 inches on each side
- Frame opening needed: (8 + 2.5 + 2.5) × (10 + 2.5 + 2.5) = 13×15 inches
Cut the Mat Board
⏱️ 15-20 minutes
The mat (also called a mount) serves multiple purposes: it creates visual separation between the artwork and frame, prevents the art from touching the glass, and adds a professional finished look.
Standard Mat Border Widths
| Artwork Size | Recommended Border | Notes |
|---|---|---|
| Up to 8×10 | 1.5 – 2 inches | Small pieces need smaller mats |
| 8×10 to 16×20 | 2 – 3 inches | Most common size range |
| 16×20 to 24×36 | 3 – 4 inches | Larger art needs wider borders |
| Over 24×36 | 4+ inches | Maintain visual balance |
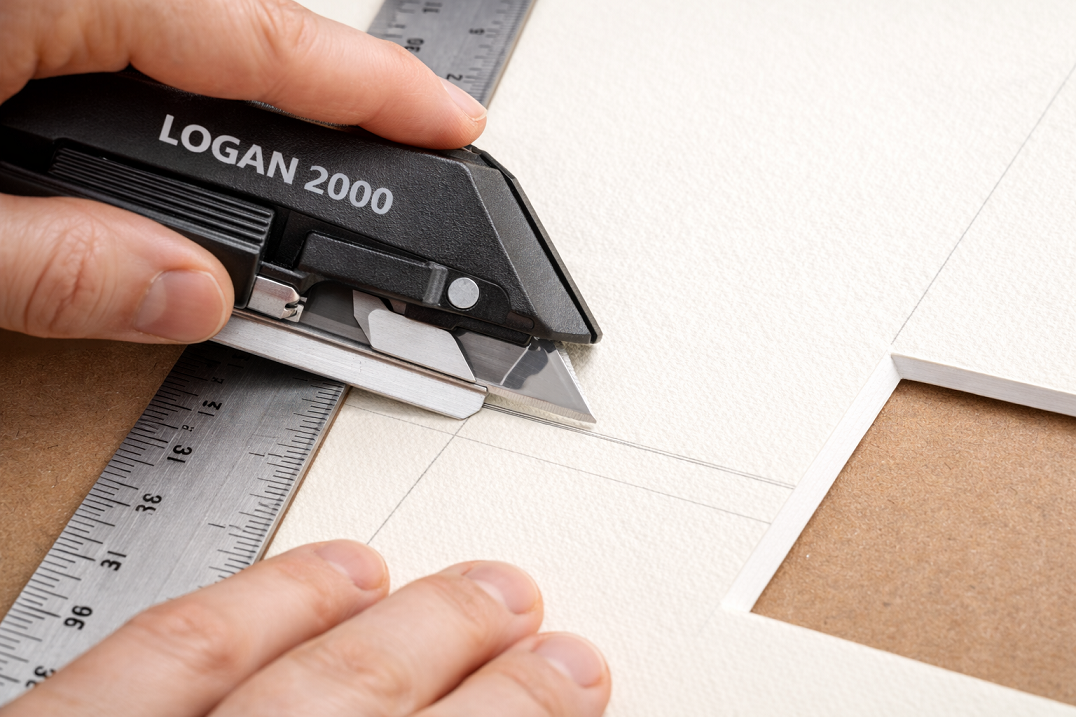
How to Cut a Mat
- Mark the outer dimensions: On the back of the mat board (the side you’ll cut from), mark the overall mat size to fit your frame
- Cut the outer edges: Use a utility knife and straightedge to cut the mat to size
- Mark the window opening: Calculate and mark the inner opening (should be 1/8″ smaller than artwork on each side to create overlap)
- Cut the window: Using a mat cutter, cut at a 45-degree bevel angle. Start and stop cuts precisely at corners
- Check the fit: Place artwork behind the opening to verify proper coverage
Double Mats
For a more sophisticated look, use two mat boards layered together. The top mat has a larger window, revealing a thin border (typically 1/4″) of the bottom mat color. This adds depth and can coordinate with colors in your artwork.
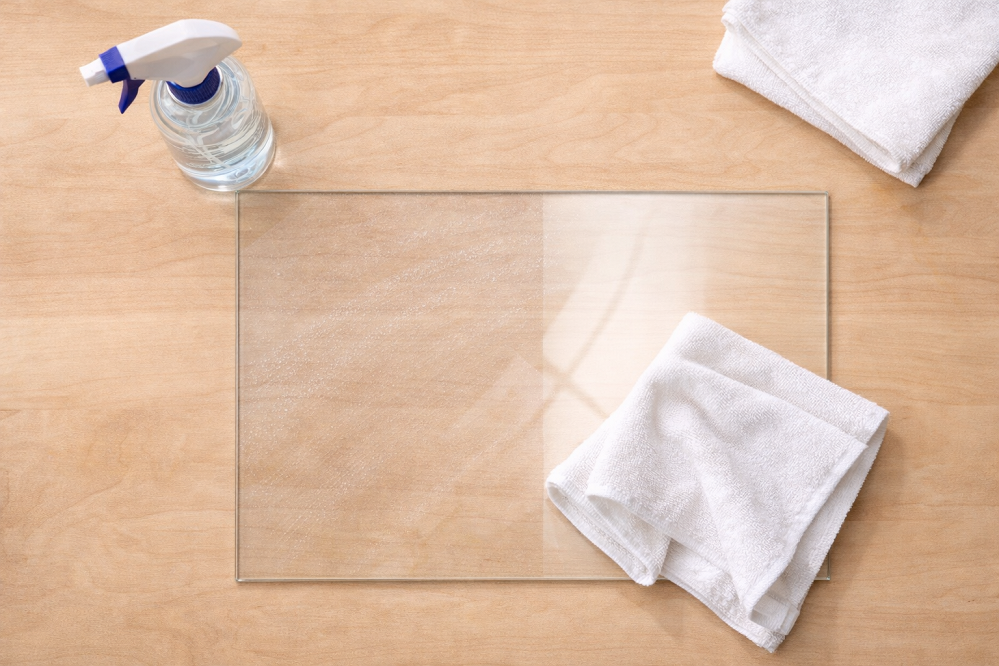
Prepare the Glass
⏱️ 5-10 minutes
Nothing ruins a framing job faster than dust or fingerprints trapped under the glass. This step requires patience and attention to detail.
Glass Cleaning Process
- Set up a clean workspace: Work in a dust-free area away from open windows or HVAC vents
- Handle properly: Always hold glass by the edges to avoid fingerprints on surfaces
- Clean both sides: Spray glass cleaner on a lint-free cloth (not directly on glass), then wipe in one direction
- Inspect at an angle: Hold glass at an angle to light to reveal any remaining dust, streaks, or fingerprints
- Final polish: Use a clean, dry lint-free cloth for final polishing
- Keep clean: Lay cleaned glass face-down on clean paper until assembly
Glass vs. Acrylic Comparison
| Feature | Glass | Acrylic |
|---|---|---|
| Clarity | Excellent | Very good |
| Scratch resistance | High | Low (scratches easily) |
| Weight | Heavy | 50% lighter |
| Safety | Can shatter | Shatter-resistant |
| Static | None | Attracts dust |
| Best for | Most framing | Large frames, shipping, kids’ areas |
Mount the Artwork
⏱️ 10-15 minutes
How you attach artwork to the mat and backing determines whether it can be safely removed later—important for valuable pieces.
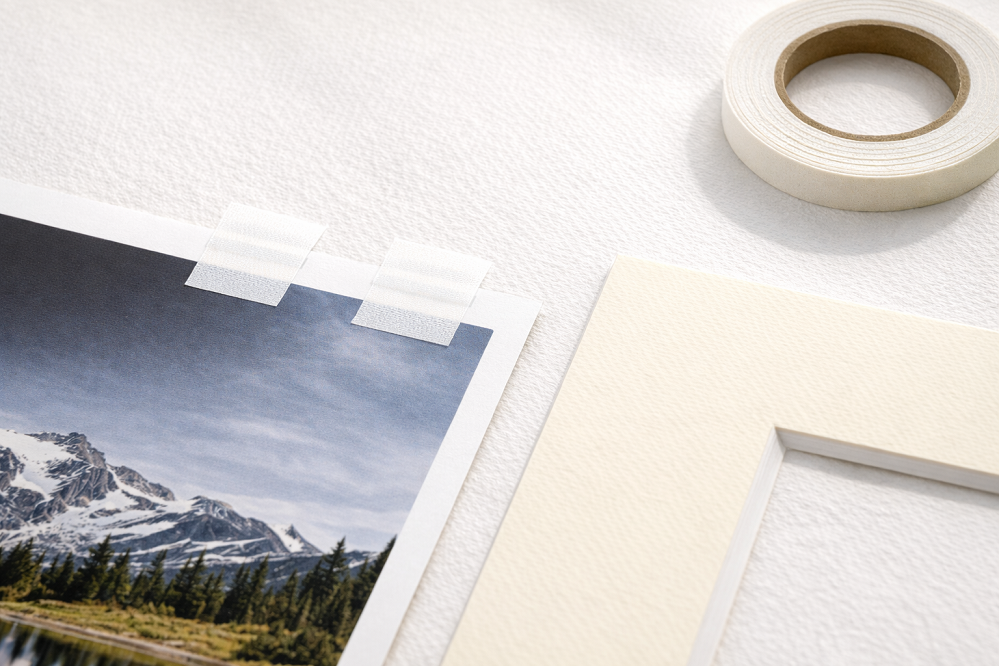
Mounting Methods
Hinge Mounting (Recommended for valuable artwork)
Uses small strips of acid-free tape to attach the artwork at the top edge only, allowing it to hang freely:
- Cut two strips of archival hinging tape, about 1 inch wide
- Attach strips to the back top edge of artwork, half on paper, half extending above
- Position artwork behind mat window
- Attach the extending tape portions to the mat or backing board
- The artwork hangs like a curtain and can be removed later without damage
Photo Corners (Good for photos and prints)
Clear or paper corners hold artwork at each corner without any adhesive touching the art itself. Easy to reposition and fully reversible.
Dry Mounting (Permanent—for posters only)
Uses heat-activated adhesive to permanently bond artwork to backing. Creates a perfectly flat presentation but is irreversible. Only use for replaceable items like posters.
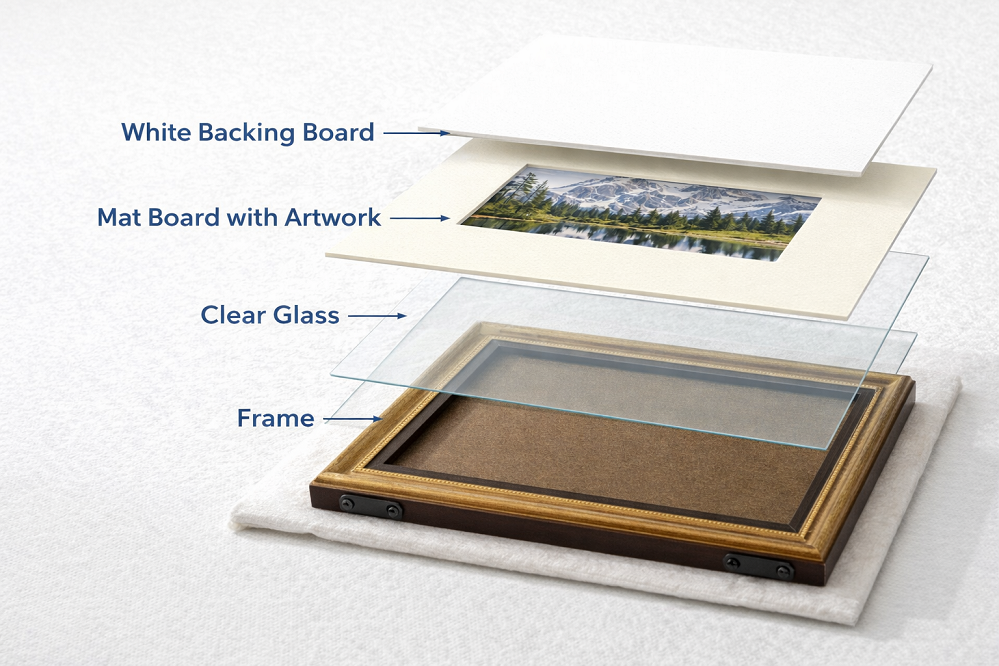
Assemble the Frame
⏱️ 10-15 minutes
Now comes the satisfying part—putting everything together. Work on a clean, padded surface to protect the frame and glass.
Assembly Order (Bottom to Top)
- Frame — Place face-down on padded surface
- Glass — Clean side facing down (toward frame front)
- Mat with artwork — Artwork facing down toward glass
- Backing board — Foam core or acid-free board
Securing the Contents
Use one of these methods to hold everything in place:
Glazier Points
- Small metal triangles pushed into frame rabbet (the lip that holds contents)
- Use a point driver or flat-head screwdriver to insert
- Place every 3-4 inches around the perimeter
- Best for: wood frames
Turn Buttons/Clips
- Metal tabs that rotate to hold backing in place
- Attach with small screws
- Easy to open if you need to access contents later
- Best for: frames you may reuse
Spring Clips
- Metal clips that snap into frame channel
- Common on metal frames
- Quick and tool-free
Seal and Finish
⏱️ 10-15 minutes
The finishing touches protect your work from dust and provide secure hanging.
Apply Dust Cover
- Cut kraft paper 1 inch larger than frame back on all sides
- Apply double-sided tape around the frame back edges
- Lay paper over frame, press down onto tape
- Trim excess paper with utility knife, leaving 1/8″ from edge
- Run your finger around edges for a clean seal
The dust cover prevents insects, dust, and debris from entering the frame over time. It also gives the back a clean, professional appearance.
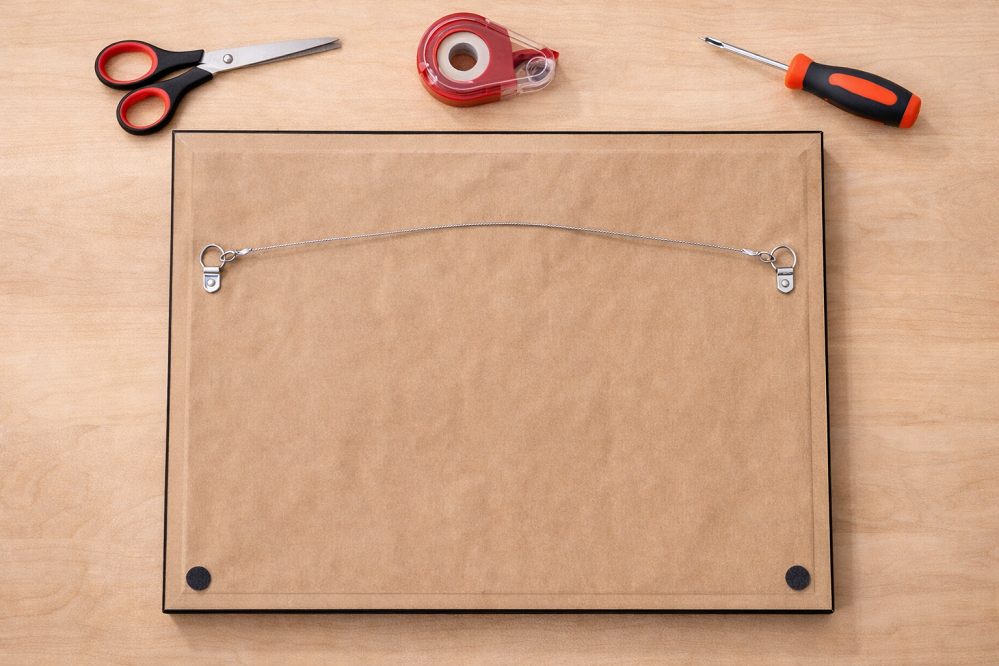
Attach Hanging Hardware
| Frame Weight | Recommended Hardware | Wall Anchor Needed |
|---|---|---|
| Under 10 lbs | Sawtooth hanger | Picture hook or small nail |
| 10-25 lbs | D-rings with wire | Wall anchor rated 25+ lbs |
| 25-50 lbs | Heavy D-rings with wire | Heavy-duty anchor or stud |
| Over 50 lbs | French cleat | Mount into wall studs |
Installing D-Rings and Wire
- Measure 1/3 down from the top of the frame on each side
- Mark and pre-drill small pilot holes
- Attach D-rings with screws (don’t overtighten—can crack frame)
- Cut picture wire 8-10 inches longer than frame width
- Thread through one D-ring, twist back on itself 3-4 times
- Run wire to other D-ring with slight slack (wire should reach 2-3 inches below top when pulled taut)
- Thread and twist to secure
Add Bumper Pads
Stick small felt or rubber bumper pads on the bottom two corners of the frame back. These:
- Protect your wall from scratches
- Allow air circulation behind the frame
- Help the frame hang straight
Hang the Frame
⏱️ 5-10 minutes
Proper hanging height makes a surprising difference in how artwork looks in a room.
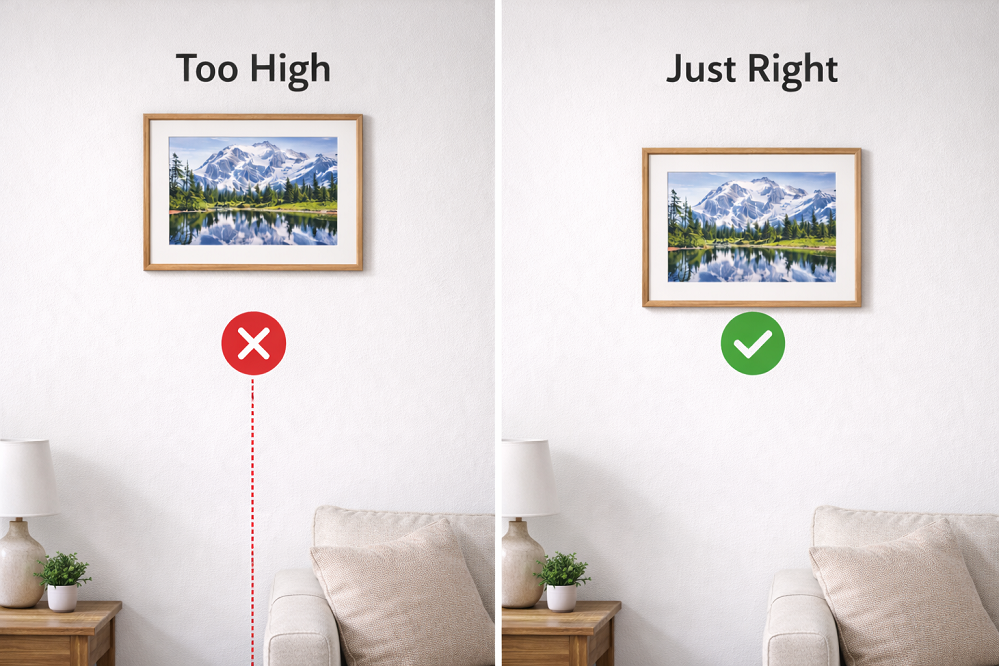
The 57-Inch Rule
The gallery standard is to hang pictures with the center of the artwork at 57 inches from the floor. This matches average eye level and creates a professional, consistent look.
How to Calculate Hook Placement
- Measure your frame height (example: 20 inches)
- Divide by 2 (= 10 inches)
- Pull wire taut and measure from wire to frame top (example: 3 inches)
- Add half the frame height to 57 inches (57 + 10 = 67 inches)
- Subtract wire-to-top measurement (67 – 3 = 64 inches)
- Mark wall at 64 inches — this is where your hook goes
Hanging Tips
- Above furniture: Keep 6-8 inches between furniture top and frame bottom
- Groupings: Maintain 2-3 inches between frames
- Use a level: Small angles are very noticeable; check with a spirit level
- Find studs: For heavy frames, always anchor into wall studs when possible
- Use two hooks: For frames wider than 24 inches, two hooks prevent tilting
Common Picture Framing Mistakes to Avoid
After two decades of framing, I’ve seen every mistake possible—and fixed thousands of DIY framing disasters. Here are the most common problems and how to avoid them.
Measuring Width × Height Backwards
Confusing width and height is the #1 DIY framing mistake. If you order an 11×14 mat but your frame is 14×11, nothing will fit.
Dust and Fingerprints Under Glass
You won’t see that tiny speck until the frame is assembled and hanging in perfect light. Then it’s all you can see.
Using Acidic Materials
Standard cardboard, masking tape, and cheap mat boards contain acids that yellow and damage artwork over time—sometimes within just a few years.
Making the Mat Window Too Large
If the mat window is larger than your artwork, you’ll see the backing board around the edges—or the artwork might fall through.
Overtightening Frame Hardware
Screwing D-rings or sawtooth hangers too tight can crack wooden frames, especially at the corners.
Hanging Too High
Most people hang pictures at their own eye level while standing, which puts artwork too high for comfortable viewing—especially when seated.
Skipping the Dust Cover
Without a sealed back, dust, insects, and moisture can enter the frame over time, damaging your artwork.
Using the Wrong Wall Anchor
A small nail in drywall can hold a small frame. It cannot hold a large frame with glass—which will eventually fall and potentially break.
Understanding Framing Materials
The right materials make the difference between framing that lasts 5 years and framing that lasts 50+ years. Here’s what you need to know about each component.
Mat Board Grades
Decorative/Paper Mats
Made from wood pulp, acid-neutralized to slow (but not prevent) deterioration. These mats contain lignin, a natural compound that breaks down over time and releases acids. Fine for posters and replaceable prints. May show yellowing after 10-20 years. Least expensive option, typically $2-5 per full sheet.
Conservation/Alpha-Cellulose Mats
Acid-free and lignin-free throughout—not just surface-treated. Made from purified wood pulp with the damaging compounds removed. Won’t yellow or transfer acids to artwork. Good for photographs, limited edition prints, and pieces you want to keep long-term. Mid-range price, typically $8-15 per full sheet. Brands like Crescent and Bainbridge produce excellent conservation boards.
Museum/Cotton Rag Board
Made from 100% cotton fiber, naturally acid-free and lignin-free without any chemical processing. The highest archival standard—this is what museums use for irreplaceable works. Can last 200+ years under proper conditions. Most expensive option at $15-30 per sheet. Worth it for original artwork, historical documents, and valuable photographs.
How to Identify Mat Board Quality
Check the core color when you cut a mat. White or off-white cores typically indicate acid-free material. Yellow or brown cores suggest acidic wood pulp. The bevel cut reveals the true composition of the board.
Glass Options
Regular Picture Frame Glass
Standard 2mm or 2.5mm clear glass. Affordable and widely available at hardware stores. Provides basic protection and blocks about 45% of UV light naturally. Best for budget framing and pieces not displayed in direct sunlight. Cost: about $1-3 per square foot.
Non-Glare Glass
Has a slightly frosted or etched surface that diffuses reflections. The tradeoff is that images appear slightly softer or hazy, especially if there’s space between the glass and artwork (as with thick mats). Best for high-glare environments where reflection is the primary concern. Not ideal for detailed artwork or photographs. Cost: about $3-5 per square foot.
Conservation/UV Glass
Coated glass that blocks 99% of UV rays while maintaining clarity. Prevents fading, color shifting, and paper deterioration caused by light exposure. A wise investment for any artwork you want to preserve. Brands like Tru Vue Conservation Clear are industry standards. Best for valuable artwork, photographs, and anything displayed near windows. Cost: about $8-12 per square foot.
Museum Glass
Premium glass that blocks 99% of UV rays AND eliminates nearly all reflection through specialized coatings. Your artwork looks like there’s no glass at all—the visual difference is striking. This is what major galleries and museums use for important works. Most expensive option but provides the best viewing experience. Brands like Tru Vue Museum Glass set the standard. Best for high-value artwork and professional display. Cost: about $15-25 per square foot.
Backing Board Options
Foam Core Board
Lightweight, rigid, and inexpensive—the most common backing material. Standard foam core has a polystyrene center between paper facings. Not acid-free in its standard form. Available in acid-free versions for archival framing. Typical thickness is 3/16″ or 1/4″. Good for general use where archival properties aren’t critical.
Corrugated Cardboard
Not recommended for any serious framing. Contains acids, attracts moisture and insects, and provides poor structural support. Only acceptable for very temporary displays or shipping protection.
Acid-Free Foam Board
Foam core made with acid-free paper facings and sometimes acid-free foam centers. Provides the convenience of regular foam board with archival properties. Good balance of price and protection.
Archival Backing Board
Rigid, acid-free, lignin-free solid board. Often includes a moisture barrier layer (typically aluminum) to prevent humidity from affecting artwork. Best choice for valuable pieces. Required for museum-level conservation framing. Browse our pre-cut backing boards and mounting boards in various sizes.
Adhesives and Tapes
Never use these on artwork:
- Regular cellophane tape (yellows, becomes brittle, leaves stains)
- Masking tape (acids damage paper, impossible to remove cleanly)
- Rubber cement (stains, deteriorates paper fibers)
- Spray adhesive (permanent, releases harmful gases over time)
- Hot glue (damages paper, difficult to remove)
Use these instead:
- Archival hinging tape — Acid-free paper tape with water-activated adhesive, fully reversible
- Linen tape — Stronger than paper tape, good for heavier artwork
- Photo corners — No adhesive touches the artwork at all
- Japanese tissue hinges — Strongest archival option, used by conservators
When to Use Professional Framing Instead
DIY framing isn’t always the best choice. Here’s when to consider professional custom framing:
Choose Professional Framing For:
- Original artwork — One-of-a-kind pieces deserve proper conservation framing
- High monetary value — Artwork worth more than $500 should be professionally protected
- Sentimental irreplaceables — Family heirlooms, historical documents, vintage photographs
- Unusual sizes or shapes — Odd dimensions require custom cutting
- 3D objects — Jerseys, medals, and memorabilia need shadow box expertise
- Canvas paintings — Stretched canvas requires specialized framing techniques
- Multiple large pieces — Time invested in DIY may exceed professional cost savings
- Gift presentation — When the framing quality reflects your thoughtfulness
DIY Framing Works Well For:
- Posters and decorative prints
- Standard-sized photographs
- Kids’ artwork you’ll rotate frequently
- Inexpensive reproductions
- Temporary displays
- Practice projects as you learn
Not sure which route to take? We offer free consultations at our Portland-area location—we’ll give honest advice even if that means recommending DIY for your project.
Frequently Asked Questions
What tools do I need to frame a picture?
Essential tools include a measuring tape, mat cutter or utility knife with straightedge, point driver or glazier points, glass cleaner, lint-free cloths, and screwdriver. A point driver gun and mat cutting system are optional but make the work faster and easier. Total investment for basic tools is around $50-100.
How do I measure a picture for framing?
Measure the width (horizontal) and height (vertical) of your artwork in inches. If using a mat, add the mat border width (typically 2-3 inches) to each side. For example, an 8×10 photo with 2.5-inch mat borders needs a 13×15 inch frame. Always double-check your math before purchasing materials.
What is the standard mat border width?
Standard mat borders range from 2 to 3 inches for most artwork. Smaller pieces (under 8×10) may use 1.5-2 inch borders, while larger pieces (over 16×20) often look better with 3-4 inch borders. Many framers use a “weighted bottom” with slightly wider bottom borders for visual balance.
How do I cut a mat board without a mat cutter?
You can use a sharp utility knife and metal straightedge, though results won’t match a proper mat cutter. Mark cuts on the mat back, use multiple light passes, and angle the knife at 45 degrees for the window cut. Practice on scrap first. For best results, invest $20-30 in a basic handheld mat cutter.
Should I use glass or acrylic for picture framing?
Glass offers better clarity and scratch resistance, making it ideal for most framing. Acrylic is lighter, shatter-resistant, and better for large frames, shipping, or homes with children. Acrylic scratches easily and attracts dust via static. For valuable art, choose UV-protective options in either material.
What type of hanging hardware should I use?
Match hardware to frame weight: sawtooth hangers for under 10 lbs, D-rings with wire for 10-25 lbs, heavy D-rings for 25-50 lbs, and French cleats for over 50 lbs. Always use wall anchors rated for your frame’s weight with a 50% safety margin.
How high should I hang a picture frame?
Hang pictures with the center at 57 inches from the floor—this is gallery standard and matches average eye level. Above furniture, keep 6-8 inches between furniture top and frame bottom. For groupings, maintain 2-3 inch spacing between frames.
How long does it take to frame a picture yourself?
For beginners, expect 60-90 minutes per frame including measuring, mat cutting, assembly, and finishing. With practice, this reduces to 30-45 minutes. Having all materials prepared in advance speeds up the process significantly.
What materials should I use for archival framing?
Use acid-free mat boards (alpha-cellulose or 100% cotton rag), acid-free backing board, UV-protective glass or acrylic, and archival hinging tape. Avoid regular tape, rubber cement, and spray adhesive. These conservation materials prevent yellowing and fading for 50+ years.
Is DIY framing worth it vs professional framing?
DIY framing saves 40-60% and works well for posters, standard photos, and decorative prints. Professional framing is worth it for valuable artwork, odd sizes, conservation needs, or when presentation quality matters. The initial tool investment ($50-100) pays off after framing 3-5 pictures.
How do I prevent dust under the glass?
Clean glass immediately before assembly in a dust-free area. Use lint-free cloths and inspect at multiple angles. Apply a kraft paper dust cover to seal the frame back. If dust appears after assembly, you’ll need to disassemble, re-clean, and reassemble.
Can I frame a picture without a mat?
Yes, but mats serve important purposes: they prevent artwork from touching glass (which can cause sticking and damage), create visual breathing room, and add a professional look. For frameless display, ensure there’s a spacer between art and glass.
Need Framing Supplies or Professional Help?
Whether you’re tackling your first DIY frame or your fiftieth, we’re here to help.
📦 Shop DIY Framing Supplies:
- → Pre-Made Frames & Metal Frames
- → Mat Sheets & Blanks | Pre-Cut Mats
- → Glass & Acrylic | Backing Boards
- → Complete Art Display Kits
- → All Framing Supplies
🖼️ Prefer Professional Results?
Custom Framing Services — Let us handle your project at wholesale prices
📞 Questions?
Portland: 503-895-7527 | Vancouver: 360-903-8969